Sarah's Garden: Exciting News!
Well, I've finally done it. I went and spent $30 on this "snip and drip" irrigation system:
[caption id="" align="alignnone" width="500"]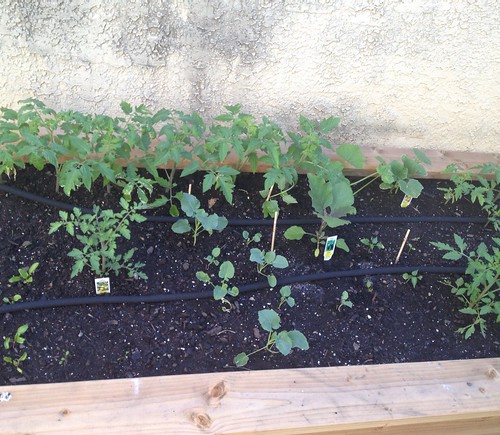 black hose is the soaker hose[/caption]
Wow!! I've never done this before because I've never uh had a working hose outside. That's right, for 2+ years I watered all my plants with two watering cans filled up at my kitchen sink multiple times a day (except for that short period when I thought the outside water line in our old house was working but then it turned out it was cracked and flooding our neighbors' basements. Sorry!) Just having a hose was already pretty sweet, but then my annual freak out about not being able to water my plants while I'm at work - "If they're drying out during the day in early May what's going to happen in July and August??" - I realized that I could just order one of these do-it-yourself irrigation kits. So I did!
[caption id="" align="alignnone" width="500"]
black hose is the soaker hose[/caption]
Wow!! I've never done this before because I've never uh had a working hose outside. That's right, for 2+ years I watered all my plants with two watering cans filled up at my kitchen sink multiple times a day (except for that short period when I thought the outside water line in our old house was working but then it turned out it was cracked and flooding our neighbors' basements. Sorry!) Just having a hose was already pretty sweet, but then my annual freak out about not being able to water my plants while I'm at work - "If they're drying out during the day in early May what's going to happen in July and August??" - I realized that I could just order one of these do-it-yourself irrigation kits. So I did!
[caption id="" align="alignnone" width="500"] raspberries are going to be so happy[/caption]
I'm not going to say too much about it because if you Google "snip and drip irrigation" you'll get tons of reviews of various products that are essentially just a length of black soaker hose and green regular hose that you connect via little black clips. There's another black clip for the end and you attach it to your hose with yet another black clip, and that was the only tricky part until I realized I was trying to connect them backwards. But there are lots of online videos to help you with that one. And then you turn on the water and watch the soaker hose soak the dirt around it - avoiding all the foliage!! - and breathe a big sigh of relief. Finally!
[caption id="" align="alignnone" width="500"]
raspberries are going to be so happy[/caption]
I'm not going to say too much about it because if you Google "snip and drip irrigation" you'll get tons of reviews of various products that are essentially just a length of black soaker hose and green regular hose that you connect via little black clips. There's another black clip for the end and you attach it to your hose with yet another black clip, and that was the only tricky part until I realized I was trying to connect them backwards. But there are lots of online videos to help you with that one. And then you turn on the water and watch the soaker hose soak the dirt around it - avoiding all the foliage!! - and breathe a big sigh of relief. Finally!
[caption id="" align="alignnone" width="500"]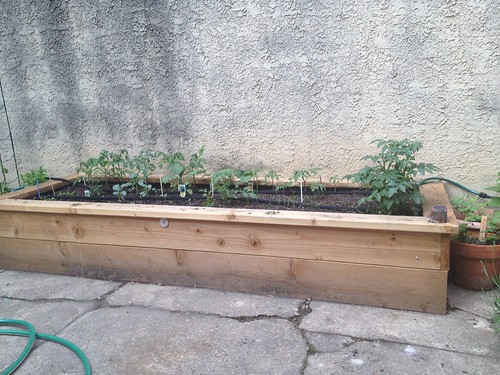 raised bed with irrigation[/caption]
So here's the obvious problem: it's ugly. I figure in about a month the plants will be so big that they'll completely cover the soaker hose and probably even the regular hose connector sections. But what to do until then?? Well, I've been thinking about drilling holes into the raised bed so that you don't see the hose sticking out on either end. I also need to get some of those metal clips that hold hoses down in the dirt because I think that will make them less visible too. Ultimately, though, this is still kind of a trial run: I'm not going to drill any holes until I'm totally satisfied that the plants are getting enough water. The good thing about this system is that it comes with 50' of soaker hose and 25' of regular hose and you just cut them to whatever length you need. You can also get a timer so that everything gets watered automatically! But I'm not ready for that level of sophistication quite yet.
I'm mostly excited about the fact that I can water my plants without getting water on the leaves. When you water at night, getting water on the leaves is no problem because it has all night to evaporate. But when you water in the morning a lot of times droplets of water are still on the plant leaves when the sun hits them and that leads to scorching, like in this picture:
[caption id="" align="alignnone" width="500"]
raised bed with irrigation[/caption]
So here's the obvious problem: it's ugly. I figure in about a month the plants will be so big that they'll completely cover the soaker hose and probably even the regular hose connector sections. But what to do until then?? Well, I've been thinking about drilling holes into the raised bed so that you don't see the hose sticking out on either end. I also need to get some of those metal clips that hold hoses down in the dirt because I think that will make them less visible too. Ultimately, though, this is still kind of a trial run: I'm not going to drill any holes until I'm totally satisfied that the plants are getting enough water. The good thing about this system is that it comes with 50' of soaker hose and 25' of regular hose and you just cut them to whatever length you need. You can also get a timer so that everything gets watered automatically! But I'm not ready for that level of sophistication quite yet.
I'm mostly excited about the fact that I can water my plants without getting water on the leaves. When you water at night, getting water on the leaves is no problem because it has all night to evaporate. But when you water in the morning a lot of times droplets of water are still on the plant leaves when the sun hits them and that leads to scorching, like in this picture:
[caption id="" align="alignnone" width="500"]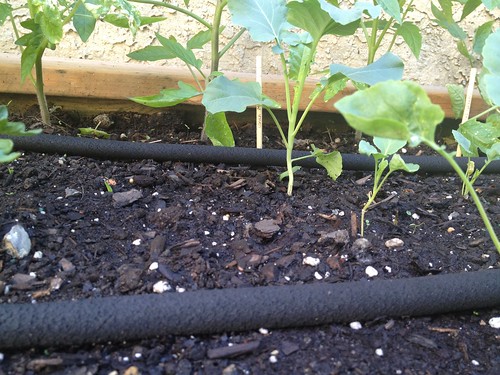 see the white on some of the leaves in the background - that's from the sun burning off water that was on the leaves[/caption]
The leaf scorching isn't really a big deal - as long as it's only a few leaves on each plant the plant's going to be fine and it doesn't affect the fruit at all. But it is kind of ugly and watering this raised bed with the hose it was impossible not to get water on everything: dirt, leaves, the wall behind it, me, my cat... you get the picture.
But really, the best thing about this is that my plants will get a steady stream of water which is best for vegetables. It's so hard to keep pots watered in the middle of the summer - I've been known to run home on my lunch break to water - and uneven watering leads to cracking and other vegetable problems. So now with my raised bed and irrigation system I'm all ready for summer! Let's go, veggies.
see the white on some of the leaves in the background - that's from the sun burning off water that was on the leaves[/caption]
The leaf scorching isn't really a big deal - as long as it's only a few leaves on each plant the plant's going to be fine and it doesn't affect the fruit at all. But it is kind of ugly and watering this raised bed with the hose it was impossible not to get water on everything: dirt, leaves, the wall behind it, me, my cat... you get the picture.
But really, the best thing about this is that my plants will get a steady stream of water which is best for vegetables. It's so hard to keep pots watered in the middle of the summer - I've been known to run home on my lunch break to water - and uneven watering leads to cracking and other vegetable problems. So now with my raised bed and irrigation system I'm all ready for summer! Let's go, veggies.
Share
black hose is the soaker hose[/caption]
Wow!! I've never done this before because I've never uh had a working hose outside. That's right, for 2+ years I watered all my plants with two watering cans filled up at my kitchen sink multiple times a day (except for that short period when I thought the outside water line in our old house was working but then it turned out it was cracked and flooding our neighbors' basements. Sorry!) Just having a hose was already pretty sweet, but then my annual freak out about not being able to water my plants while I'm at work - "If they're drying out during the day in early May what's going to happen in July and August??" - I realized that I could just order one of these do-it-yourself irrigation kits. So I did!
[caption id="" align="alignnone" width="500"] raspberries are going to be so happy[/caption]
I'm not going to say too much about it because if you Google "snip and drip irrigation" you'll get tons of reviews of various products that are essentially just a length of black soaker hose and green regular hose that you connect via little black clips. There's another black clip for the end and you attach it to your hose with yet another black clip, and that was the only tricky part until I realized I was trying to connect them backwards. But there are lots of online videos to help you with that one. And then you turn on the water and watch the soaker hose soak the dirt around it - avoiding all the foliage!! - and breathe a big sigh of relief. Finally!
[caption id="" align="alignnone" width="500"] raised bed with irrigation[/caption]
So here's the obvious problem: it's ugly. I figure in about a month the plants will be so big that they'll completely cover the soaker hose and probably even the regular hose connector sections. But what to do until then?? Well, I've been thinking about drilling holes into the raised bed so that you don't see the hose sticking out on either end. I also need to get some of those metal clips that hold hoses down in the dirt because I think that will make them less visible too. Ultimately, though, this is still kind of a trial run: I'm not going to drill any holes until I'm totally satisfied that the plants are getting enough water. The good thing about this system is that it comes with 50' of soaker hose and 25' of regular hose and you just cut them to whatever length you need. You can also get a timer so that everything gets watered automatically! But I'm not ready for that level of sophistication quite yet.
I'm mostly excited about the fact that I can water my plants without getting water on the leaves. When you water at night, getting water on the leaves is no problem because it has all night to evaporate. But when you water in the morning a lot of times droplets of water are still on the plant leaves when the sun hits them and that leads to scorching, like in this picture:
[caption id="" align="alignnone" width="500"] see the white on some of the leaves in the background - that's from the sun burning off water that was on the leaves[/caption]
The leaf scorching isn't really a big deal - as long as it's only a few leaves on each plant the plant's going to be fine and it doesn't affect the fruit at all. But it is kind of ugly and watering this raised bed with the hose it was impossible not to get water on everything: dirt, leaves, the wall behind it, me, my cat... you get the picture.
But really, the best thing about this is that my plants will get a steady stream of water which is best for vegetables. It's so hard to keep pots watered in the middle of the summer - I've been known to run home on my lunch break to water - and uneven watering leads to cracking and other vegetable problems. So now with my raised bed and irrigation system I'm all ready for summer! Let's go, veggies.
Sarah's Garden: Exciting News!
Well, I've finally done it. I went and spent $30 on this "snip and drip" irrigation system:
[caption id="" align="alignnone" width="500"] black hose is the soaker hose[/caption]
Wow!! I've never done this before because I've never uh had a working hose outside. That's right, for 2+ years I watered all my plants with two watering cans filled up at my kitchen sink multiple times a day (except for that short period when I thought the outside water line in our old house was working but then it turned out it was cracked and flooding our neighbors' basements. Sorry!) Just having a hose was already pretty sweet, but then my annual freak out about not being able to water my plants while I'm at work - "If they're drying out during the day in early May what's going to happen in July and August??" - I realized that I could just order one of these do-it-yourself irrigation kits. So I did!
[caption id="" align="alignnone" width="500"] raspberries are going to be so happy[/caption]
I'm not going to say too much about it because if you Google "snip and drip irrigation" you'll get tons of reviews of various products that are essentially just a length of black soaker hose and green regular hose that you connect via little black clips. There's another black clip for the end and you attach it to your hose with yet another black clip, and that was the only tricky part until I realized I was trying to connect them backwards. But there are lots of online videos to help you with that one. And then you turn on the water and watch the soaker hose soak the dirt around it - avoiding all the foliage!! - and breathe a big sigh of relief. Finally!
[caption id="" align="alignnone" width="500"] raised bed with irrigation[/caption]
So here's the obvious problem: it's ugly. I figure in about a month the plants will be so big that they'll completely cover the soaker hose and probably even the regular hose connector sections. But what to do until then?? Well, I've been thinking about drilling holes into the raised bed so that you don't see the hose sticking out on either end. I also need to get some of those metal clips that hold hoses down in the dirt because I think that will make them less visible too. Ultimately, though, this is still kind of a trial run: I'm not going to drill any holes until I'm totally satisfied that the plants are getting enough water. The good thing about this system is that it comes with 50' of soaker hose and 25' of regular hose and you just cut them to whatever length you need. You can also get a timer so that everything gets watered automatically! But I'm not ready for that level of sophistication quite yet.
I'm mostly excited about the fact that I can water my plants without getting water on the leaves. When you water at night, getting water on the leaves is no problem because it has all night to evaporate. But when you water in the morning a lot of times droplets of water are still on the plant leaves when the sun hits them and that leads to scorching, like in this picture:
[caption id="" align="alignnone" width="500"] see the white on some of the leaves in the background - that's from the sun burning off water that was on the leaves[/caption]
The leaf scorching isn't really a big deal - as long as it's only a few leaves on each plant the plant's going to be fine and it doesn't affect the fruit at all. But it is kind of ugly and watering this raised bed with the hose it was impossible not to get water on everything: dirt, leaves, the wall behind it, me, my cat... you get the picture.
But really, the best thing about this is that my plants will get a steady stream of water which is best for vegetables. It's so hard to keep pots watered in the middle of the summer - I've been known to run home on my lunch break to water - and uneven watering leads to cracking and other vegetable problems. So now with my raised bed and irrigation system I'm all ready for summer! Let's go, veggies.
Share
[caption id="" align="alignnone" width="500"] black hose is the soaker hose[/caption]
Wow!! I've never done this before because I've never uh had a working hose outside. That's right, for 2+ years I watered all my plants with two watering cans filled up at my kitchen sink multiple times a day (except for that short period when I thought the outside water line in our old house was working but then it turned out it was cracked and flooding our neighbors' basements. Sorry!) Just having a hose was already pretty sweet, but then my annual freak out about not being able to water my plants while I'm at work - "If they're drying out during the day in early May what's going to happen in July and August??" - I realized that I could just order one of these do-it-yourself irrigation kits. So I did!
[caption id="" align="alignnone" width="500"] raspberries are going to be so happy[/caption]
I'm not going to say too much about it because if you Google "snip and drip irrigation" you'll get tons of reviews of various products that are essentially just a length of black soaker hose and green regular hose that you connect via little black clips. There's another black clip for the end and you attach it to your hose with yet another black clip, and that was the only tricky part until I realized I was trying to connect them backwards. But there are lots of online videos to help you with that one. And then you turn on the water and watch the soaker hose soak the dirt around it - avoiding all the foliage!! - and breathe a big sigh of relief. Finally!
[caption id="" align="alignnone" width="500"] raised bed with irrigation[/caption]
So here's the obvious problem: it's ugly. I figure in about a month the plants will be so big that they'll completely cover the soaker hose and probably even the regular hose connector sections. But what to do until then?? Well, I've been thinking about drilling holes into the raised bed so that you don't see the hose sticking out on either end. I also need to get some of those metal clips that hold hoses down in the dirt because I think that will make them less visible too. Ultimately, though, this is still kind of a trial run: I'm not going to drill any holes until I'm totally satisfied that the plants are getting enough water. The good thing about this system is that it comes with 50' of soaker hose and 25' of regular hose and you just cut them to whatever length you need. You can also get a timer so that everything gets watered automatically! But I'm not ready for that level of sophistication quite yet.
I'm mostly excited about the fact that I can water my plants without getting water on the leaves. When you water at night, getting water on the leaves is no problem because it has all night to evaporate. But when you water in the morning a lot of times droplets of water are still on the plant leaves when the sun hits them and that leads to scorching, like in this picture:
[caption id="" align="alignnone" width="500"] see the white on some of the leaves in the background - that's from the sun burning off water that was on the leaves[/caption]
The leaf scorching isn't really a big deal - as long as it's only a few leaves on each plant the plant's going to be fine and it doesn't affect the fruit at all. But it is kind of ugly and watering this raised bed with the hose it was impossible not to get water on everything: dirt, leaves, the wall behind it, me, my cat... you get the picture.
But really, the best thing about this is that my plants will get a steady stream of water which is best for vegetables. It's so hard to keep pots watered in the middle of the summer - I've been known to run home on my lunch break to water - and uneven watering leads to cracking and other vegetable problems. So now with my raised bed and irrigation system I'm all ready for summer! Let's go, veggies.
Co-ops helping co-ops and how that helps OUR co-op
A few days ago, the website Generocity posted a great write-up of a recent meeting of Philly-area co-ops who are coming together to forge partnership and leverage their collective strength in the service of making operational and marketing improvements. As someone who has been working on the marketing of the South Philly Food Co-op, I was particularly encouraged by this piece:
Share
On the marketing end, Weavers Way, Swarthmore and potentially Creekside will be setting up kiosks at WXPN’s Xponential Festival on the Camden Waterfront. They will be clustered in an area called “Co-op Row” and will likely share staff and resources throughout the event. The possibility of collectively buying ad-space on WHYY was also discussed as a way to market for the individual stores and to draw attention to co-ops generally.This is exciting stuff for us in that any effort made by the region's co-ops to create awareness of the co-op model will help our efforts to attract members. This kind of work will go a long way of moving our target population/geography from "nothing" to "awareness." And as we've seen during this whole process that has helped us get 464 member-owners, once people hear about the Co-op and get an idea of what the cooperative form of ownership is all about, it doesn't take much more to get them to be members. Great news! We look forward to seeing you at our Spring General Membership meeting on May 19.
Sarah's Garden: May Showers
Well the raised bed vegetables had a very hot and sunny first few days but thanks to the rain earlier this week they seem to be doing just fine:
[caption id="" align="alignnone" width="500"] I know they don't look like much yet. Just wait![/caption]
While the picture above makes them look pretty scrawny (and they are) I am feeling hopeful because of this:
[caption id="" align="alignnone" width="375"] hey it's another picture of a tomato plant[/caption]
Okay - this is a picture I take every year, I'm sure of it. Yes, here's a blurry version from last year:
[caption id="" align="alignnone" width="375"] tomato blur[/caption]
What these pictures are of, besides random tomato plant crowns, is that yellowish-green color of the new growth. One thing I have learned over these few years is that this is a very good sign: the plants are healthy, adequately watered and probably growing very fast. I love seeing that "growth spurt" color - then I feel like I can relax a bit because I didn't kill all my seedlings when transplanting them. Good news!
That's all until next week, except that I found these two cuties growing in a pot with some ginkgos:
[caption id="" align="alignnone" width="375"] who are you?[/caption]
A closer look reveals:
[caption id="" align="alignnone" width="375"] hello![/caption]
Swiss chard! I let my chard go to seed last year hoping to harvest the seeds but never getting around to it (gotta get better on that) but I guess a few seeds flew into some neighboring pots! Good thing, because my mustard greens are not looking so good.
Share
[caption id="" align="alignnone" width="500"] I know they don't look like much yet. Just wait![/caption]
While the picture above makes them look pretty scrawny (and they are) I am feeling hopeful because of this:
[caption id="" align="alignnone" width="375"] hey it's another picture of a tomato plant[/caption]
Okay - this is a picture I take every year, I'm sure of it. Yes, here's a blurry version from last year:
[caption id="" align="alignnone" width="375"] tomato blur[/caption]
What these pictures are of, besides random tomato plant crowns, is that yellowish-green color of the new growth. One thing I have learned over these few years is that this is a very good sign: the plants are healthy, adequately watered and probably growing very fast. I love seeing that "growth spurt" color - then I feel like I can relax a bit because I didn't kill all my seedlings when transplanting them. Good news!
That's all until next week, except that I found these two cuties growing in a pot with some ginkgos:
[caption id="" align="alignnone" width="375"] who are you?[/caption]
A closer look reveals:
[caption id="" align="alignnone" width="375"] hello![/caption]
Swiss chard! I let my chard go to seed last year hoping to harvest the seeds but never getting around to it (gotta get better on that) but I guess a few seeds flew into some neighboring pots! Good thing, because my mustard greens are not looking so good.
Sarah's Garden: May Showers
Well the raised bed vegetables had a very hot and sunny first few days but thanks to the rain earlier this week they seem to be doing just fine:
[caption id="" align="alignnone" width="500"] I know they don't look like much yet. Just wait![/caption]
While the picture above makes them look pretty scrawny (and they are) I am feeling hopeful because of this:
[caption id="" align="alignnone" width="375"]
I know they don't look like much yet. Just wait![/caption]
While the picture above makes them look pretty scrawny (and they are) I am feeling hopeful because of this:
[caption id="" align="alignnone" width="375"]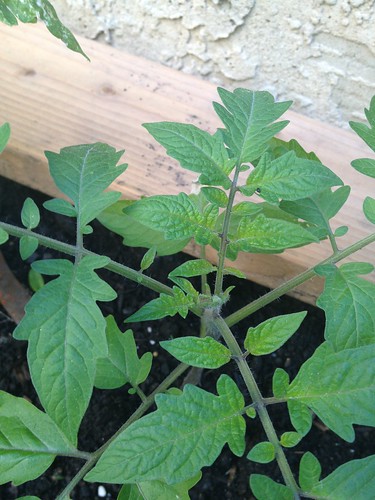 hey it's another picture of a tomato plant[/caption]
Okay - this is a picture I take every year, I'm sure of it. Yes, here's a blurry version from last year:
[caption id="" align="alignnone" width="375"]
hey it's another picture of a tomato plant[/caption]
Okay - this is a picture I take every year, I'm sure of it. Yes, here's a blurry version from last year:
[caption id="" align="alignnone" width="375"]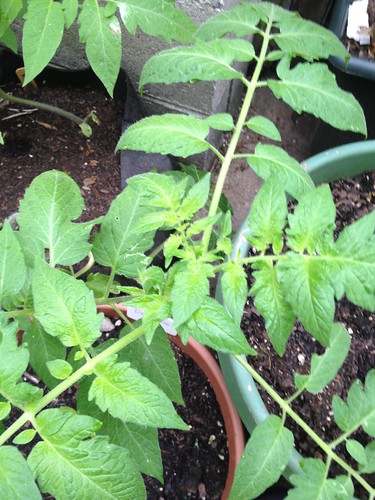 tomato blur[/caption]
What these pictures are of, besides random tomato plant crowns, is that yellowish-green color of the new growth. One thing I have learned over these few years is that this is a very good sign: the plants are healthy, adequately watered and probably growing very fast. I love seeing that "growth spurt" color - then I feel like I can relax a bit because I didn't kill all my seedlings when transplanting them. Good news!
That's all until next week, except that I found these two cuties growing in a pot with some ginkgos:
[caption id="" align="alignnone" width="375"]
tomato blur[/caption]
What these pictures are of, besides random tomato plant crowns, is that yellowish-green color of the new growth. One thing I have learned over these few years is that this is a very good sign: the plants are healthy, adequately watered and probably growing very fast. I love seeing that "growth spurt" color - then I feel like I can relax a bit because I didn't kill all my seedlings when transplanting them. Good news!
That's all until next week, except that I found these two cuties growing in a pot with some ginkgos:
[caption id="" align="alignnone" width="375"]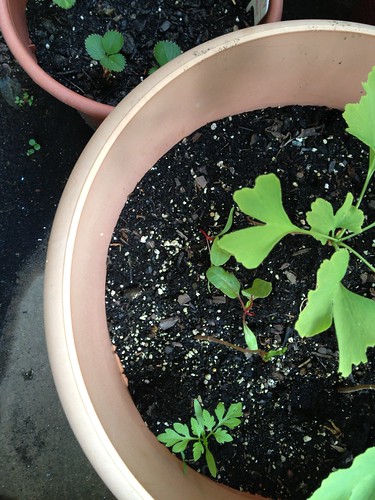 who are you?[/caption]
A closer look reveals:
[caption id="" align="alignnone" width="375"]
who are you?[/caption]
A closer look reveals:
[caption id="" align="alignnone" width="375"]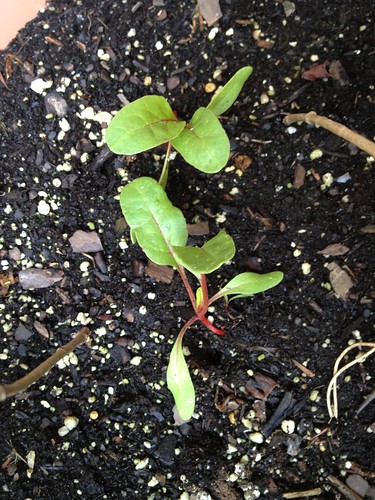 hello![/caption]
Swiss chard! I let my chard go to seed last year hoping to harvest the seeds but never getting around to it (gotta get better on that) but I guess a few seeds flew into some neighboring pots! Good thing, because my mustard greens are not looking so good.
hello![/caption]
Swiss chard! I let my chard go to seed last year hoping to harvest the seeds but never getting around to it (gotta get better on that) but I guess a few seeds flew into some neighboring pots! Good thing, because my mustard greens are not looking so good.
Share
I know they don't look like much yet. Just wait![/caption]
While the picture above makes them look pretty scrawny (and they are) I am feeling hopeful because of this:
[caption id="" align="alignnone" width="375"] hey it's another picture of a tomato plant[/caption]
Okay - this is a picture I take every year, I'm sure of it. Yes, here's a blurry version from last year:
[caption id="" align="alignnone" width="375"] tomato blur[/caption]
What these pictures are of, besides random tomato plant crowns, is that yellowish-green color of the new growth. One thing I have learned over these few years is that this is a very good sign: the plants are healthy, adequately watered and probably growing very fast. I love seeing that "growth spurt" color - then I feel like I can relax a bit because I didn't kill all my seedlings when transplanting them. Good news!
That's all until next week, except that I found these two cuties growing in a pot with some ginkgos:
[caption id="" align="alignnone" width="375"] who are you?[/caption]
A closer look reveals:
[caption id="" align="alignnone" width="375"] hello![/caption]
Swiss chard! I let my chard go to seed last year hoping to harvest the seeds but never getting around to it (gotta get better on that) but I guess a few seeds flew into some neighboring pots! Good thing, because my mustard greens are not looking so good.
Pallet Gardening Workshop - Turning Trash Into Treasurers!
Saturday, June 1, 2013, 11:00 AM - 12:30 PM
South Philadelphia High School, 2101 S. Broad Street, Philadelphia, PA 19148
Want to make your very own garden out of a wooden pallet for your South Philly home? Then join us at this FREE workshop! A pallet garden is the perfect solution for your urban garden.
We'll receive a brief intro to the gardens at South Philly High School, the different methods of growing they experiment with, an overview of pallet gardening, and walk-through of pallet garden installation. Then, you'll break into groups to make a pallet garden, receive care instructions, and enjoy some potluck snacks together.
All materials and seeds are completely free! What's stopping you from creating a beautiful pallet garden of your own?
Share
Tour Mariposa's Awesome New Facility - a vision of our future!
Want to see what our Co-op might look like? Join us for a tour of Mariposa Food Co-op in West Philly.
You can select to either meet at the Fountain at East Passyunk Ave and Tasker Street at 11am to travel together via car or bike, or meet at Mariposa at 4824 Baltimore Ave at noon.
After meeting from a representative of this awesome community-owned grocery store, we'll buy lunch and then visit Little Baby's Ice Cream at their new Cedar Park location.
Saturday, May 11, 2013, 12:00 PM - 2:00 PM
Mariposa Co-op, 4824 Baltimore Avenue, Philadelphia, PA 19143
(A group will be departing from the Fountain at East Passyunk and Tasker at 11am)
Share